Firing Up the Flavor: My First Roasted Aged Tea for Sale!
Posted by Yat on 13th Jan 2025
Hey everyone! I'm thrilled to announce that I've roasted my first batch of aged tea for sale! It was a little nerve-wracking, but the whole process was truly exciting. And guess what? I did it all with a regular home oven! I'm sharing the details to inspire you to try roasting your own aged tea – it's totally doable!
Tea Selection: Why Rou Gui?
For this inaugural roast, I chose my 2008 Wuyi Rou Gui Yancha (Rou Gui, by the way, means "cinnamon" in Chinese, although the tea itself doesn't necessarily taste like cinnamon). Rou Gui is known for its complex aromas, often described as flowery and fruity, which develop partially from the fermentation process. Now, before you think I'm selling you something subpar, hear me out. This wasn't my absolute best tea (I'm saving that for later!), and using a more affordable tea took some of the pressure off for this first attempt. It's a great tea with lots of potential, just needing a little extra love.
The Tea's Before State: A Sleepy Rou Gui
This particular Rou Gui was a bit… sleepy. It had dried out over the years, lost some of its vibrancy, and the texture wasn't quite where I wanted it. While it still had a pleasant sweetness mixed of fruity aroma with a slightly grassy note, and a good pungent kick with longer steeping, it was definitely ready for a transformation. Roasting is a one-way street – you can't go back to a light roast once you go medium to high – so I planned my approach carefully.
The Roasting Plan: Gentle and Gradual in a Home Oven
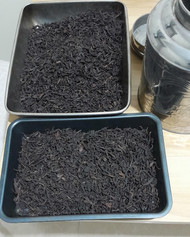
My goal wasn't to completely change the tea's character, but to enhance its existing qualities and extend its shelf life. I was aiming for a medium roast that sharpens the texture and adds a touch of that enticing charcoal aroma. I used a standard home oven (not a huge one) and spread about 500 grams of tea leaves 2-3 cm thick on a baking sheet. Here's the temperature schedule I followed:
Gradually increase temperature...
- 80°C for 30 min: Gently awakened the leaves and began to evaporate excess moisture.
- 100°C for 30 min: Further reduced moisture and started to build vibrancy.
- 120°C for 30 min: Really got things moving! This stage was key for enhancing the texture and diminishing that grassy note.
- 130°C for 30 min: The final touch, where that beautiful baking charcoal aroma started to emerge.
Post-Roast Impressions: First Impressions
And the results are in! Right now, it's a lovely medium roast with a hint of charcoal – definitely not that over-roasted, charcoal-black flavor that I dislike in some aged oolongs. It's still fragrant and slightly vegetal(less), with no sourness. There's still a bit of mystery surrounding it, though, as roasted teas need time to settle.

Try It Yourself!
This tea will be for sale, but I encourage you to start with a small sample (maybe buy 25g) to see if you enjoy this style of aged roasted tea. My goal with this post is to share my experience and inspire you to experiment with aging and roasting your own tea at home. Let me know what you think! I'm eager to hear your feedback and learn from each other.

